
BDSP’s PokéRadar Is Familiar, But Not the Same
The PokéRadar returns in Pokémon Brilliant Diamond and Shining Pearl, but even though these games are remakes of Diamond and Pearl, the radar does not behave the same way it did on the Nintendo DS.
Because Brilliant Diamond and Shining Pearl are remakes of Diamond and Pearl, you might expect the PokéRadar to behave similarly, and in some ways, you would be right. BDSP took the PokéRadar and simplified it for the remake, but in that process of simplification, it also made using the radar more frustrating at times, and arguably even less forgiving. The grass animations are clearer, the chain-tracking tools are more convenient, and the method is slightly easier to understand. However, the chain continuation rate is less forgiving than it was in the DS counterparts.
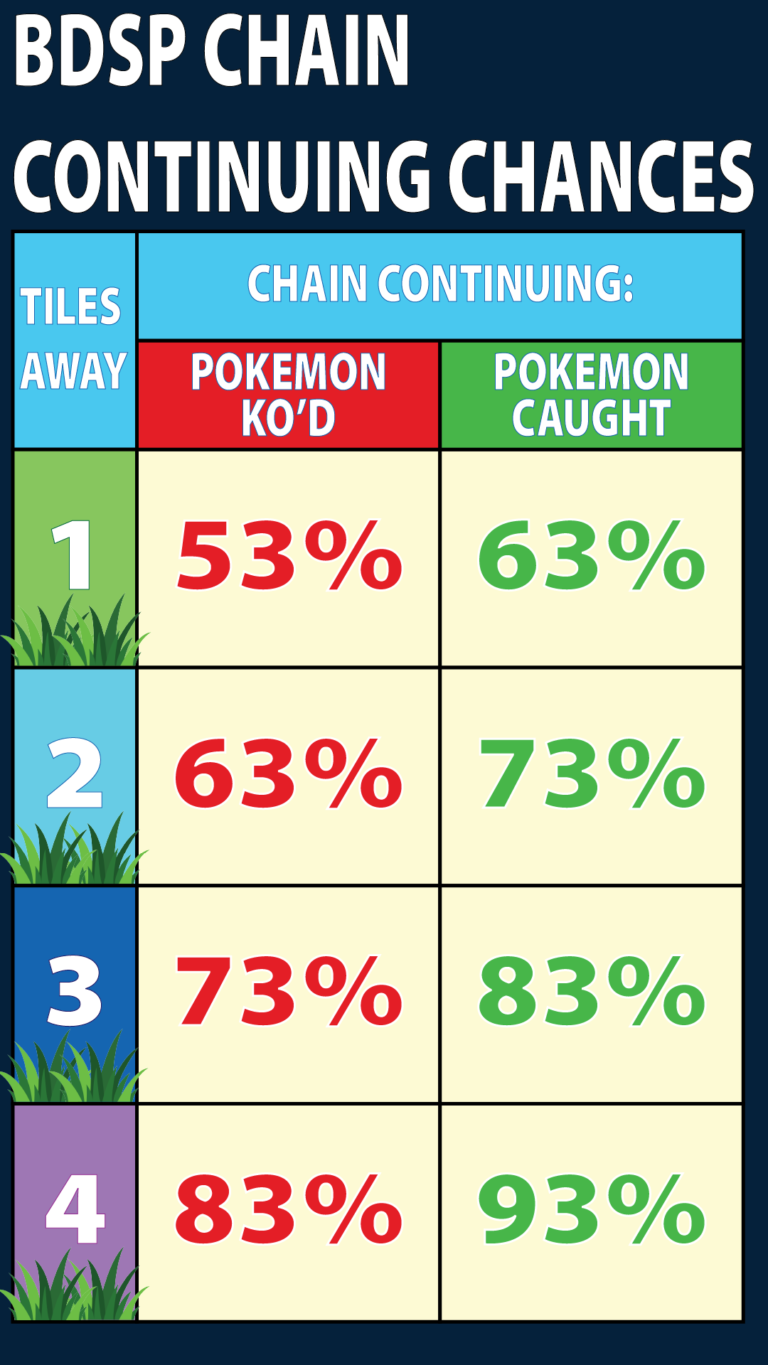
If you are coming from the original Diamond, Pearl, and Platinum, the biggest adjustment is this: in BDSP, catching your target in a grass patch four tiles away gives you a 93% chance to continue your chain. That sounds reliable until you realize that a 7% failure chance happens after every successful catch, which adds up quickly when your goal is a 40 chain.

Please note that some external links on this page are affiliate links, which means if you click them and make a purchase we may receive a small percentage of the sale.
What Makes BDSP’s PokéRadar Different?
At a basic level, BDSP’s PokéRadar still follows the same idea as the original games. You activate the radar in a grass patch, enter shaking grass, encounter a Pokémon, then either catch or defeat that Pokémon to continue the chain.
The difference is that BDSP makes some parts of the process cleaner while changing the strategy around chain length.
In the original Sinnoh games, reaching a 40 chain is the classic goal because that is where the shiny odds become strongest. That remains true in BDSP, where the best shiny odds cap at a chain of 40, at roughly 1 in 99.
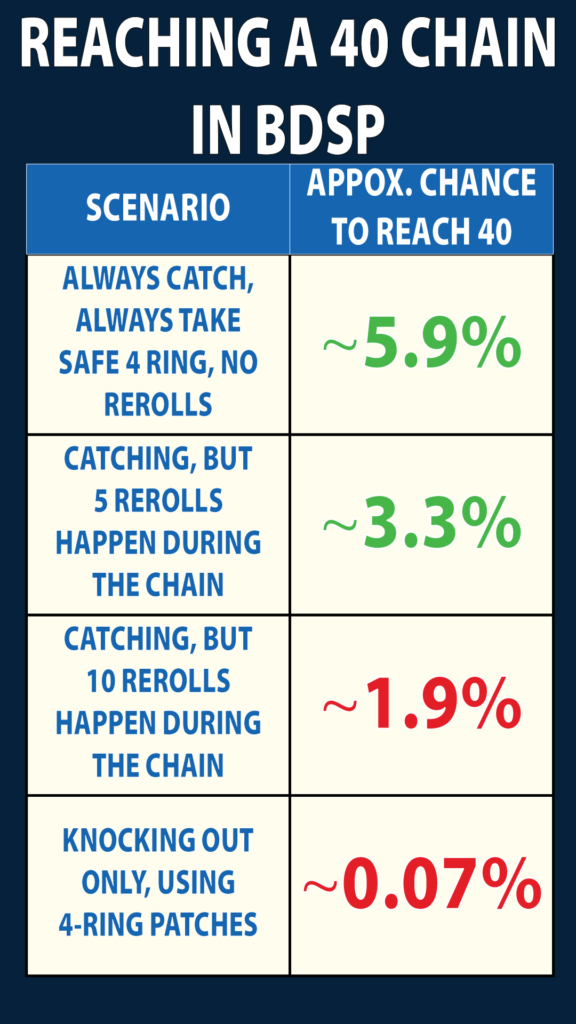
However, reaching 40 in BDSP is much less consistent than the number “93%” makes it sound. If you caught every Pokémon and always selected a safe four-tile patch, your chance of maintaining the chain through 39 continuations is only about 5.9%.
That means BDSP gives players an important strategic choice.
You can push for 40 and get the best shiny odds, or you can stop earlier and reset the radar repeatedly, accepting worse odds per patch in exchange for a much lower chance of your chain randomly collapsing.
That decision is the heart of BDSP PokéRadar hunting.
More Articles

Please note that some external links on this page are affiliate links, which means if you click them and make a purchase we may receive a small percentage of the sale.
What You’ll Need Before Starting
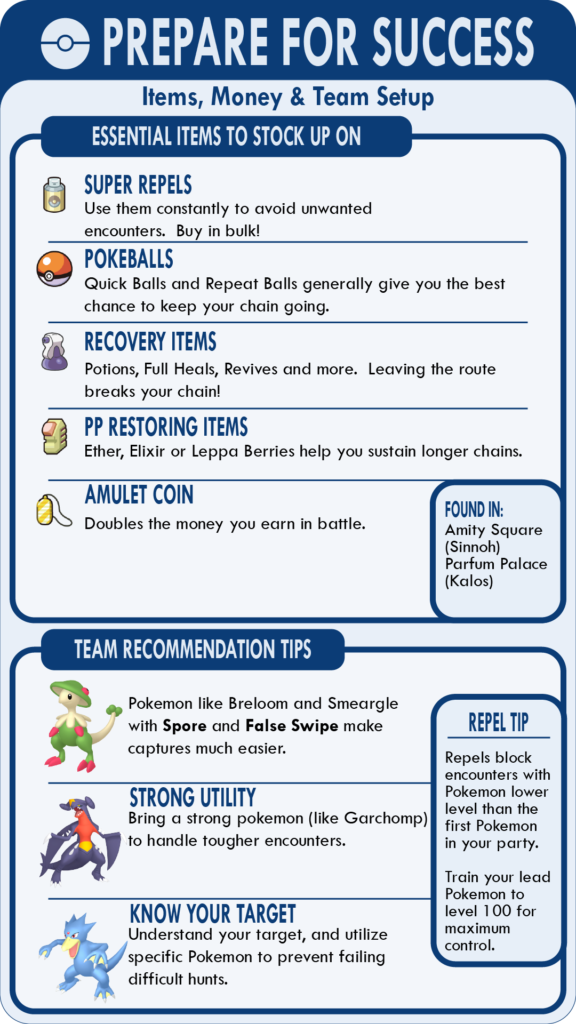
If you already followed the core PokéRadar preparation guide, you should be mostly ready. Still, here is a quick BDSP-specific checklist before you begin:
- A large supply of Super Repels
- Plenty of Poké Balls, especially Quick Balls and Repeat Balls
- A catching Pokémon with False Swipe and a reliable status move
- A high-level lead Pokémon for Repel control
- Enough PC space for repeated captures
- The PokéRadar registered for quick use
- The Chain Counter Pokétch app
The Chain Counter app is useful in BDSP because it lets you confirm how far along you are in your chain. However, the trick from the original games where the chain can visibly break before you encounter the Pokémon is not present in BDSP, which removes some of the app’s usefulness.
Starting a Chain in BDSP
Once you are positioned in the grass, use a Repel and save your game. Saving the game does not save your chain progress, but if your chain breaks, it is nice to have a previous save you can revert to in order to preserve the items you may have lost.
After saving the game, activate the PokéRadar.
Several grass patches will shake around you, and you may notice three different types of animations: regular patches, Hidden Ability patches, and the coveted shiny patch. BDSP is the first game where you can get a shiny patch on a chain of 0.
A key difference between BDSP and the original games is that the shaking patches remain visible on your screen, removing the memory game aspect of the PokéRadar. Your goal is to pick a patch, encounter the Pokémon inside, and decide whether that Pokémon is the one you want to hunt.
If it is not your target, reset the game by pressing the Home button, closing the game, and trying again from your save.
Similarly to the original games, if the Pokémon is something you want to hunt, how you choose to proceed directly impacts how successful your chain will be. To progress your chain, you will want to either capture or KO the Pokémon, with catching the Pokémon giving you a boost to your chain continuation odds.
Once you catch or KO the Pokémon, more grass patches may shake. If they do, your chain is still alive. If no grass patches shake, your chain has ended.
Always Prioritize Four-Tile Patches
The safest patches are the ones that shake four tiles away from your character, and in BDSP, you can enter patches that are four tiles away even if they are on the edge of the grass.
This is a key difference from the original games, and it makes the PokéRadar significantly easier to use in BDSP.
Resetting the Radar
One of the most important skills in BDSP PokéRadar hunting is knowing when to stop moving forward and reroll the grass.
To reset the radar, walk 50 steps without entering a shaking patch, then use the PokéRadar again. This gives you a new set of shaking patches while keeping your current chain active, if you avoid accidental encounters and do not leave the area.
In BDSP, because the shaking grass remains visible, you can run in circles in a safe location away from any shaking grass until you reach the 50 steps needed to reset the radar.
This becomes especially important once your chain gets a little higher. At that point, the risk of choosing a bad patch is usually not worth it.
Should You Stop at 17 or Push to 40?
The traditional PokéRadar strategy is to build a chain to 40, then stop encountering Pokémon and repeatedly reset the radar until a shiny patch appears. That still works in BDSP, and it gives you the best shiny odds. At chain 40, each shaking patch has about a 1 in 99 chance of being shiny, meaning a full set of four patches gives you roughly a 4% chance per radar reset.
The problem is getting there.
That is why many BDSP shiny hunters prefer stopping around 17 instead. At 17, your shiny odds are much worse than they are at 40, but your chance of reaching that chain is much more realistic. A 93% continuation rate gives you about a 31.3% chance to reach 17 successful continuations, compared to about 5.9% for 40.
At 17, the shiny odds are around 1 in 1986 per patch, or roughly 0.2% per full four-patch radar reset.
That sounds low, but the tradeoff is that you are preserving a chain that was much easier to build.
So, which strategy should you use? If you want the classic high-risk, high-reward PokéRadar experience, push beyond 17. If you want a more stable BDSP-specific strategy, stop around 17 and reset for shiny patches. Neither approach is wrong. They just ask for different kinds of patience.
When to Stop Advancing the Chain
Once you decide to stop advancing your chain, the hunt changes completely.
Do not enter normal shaking grass anymore.
At that point, your only job is to keep walking 50 steps, reset the radar, make sure your Repel is active, and look for a shiny patch. If no shiny patch appears, repeat the process.
This is where BDSP’s clearer visuals help. Shiny patches sparkle distinctly, making them easy to identify, especially because shaking grass now stays on the screen until your chain breaks.
Common Ways to Break a Chain in BDSP
A PokéRadar chain can break in several ways, and some of them are easy to avoid once you know what to watch for.
Your chain can break if you:
- Encounter a Pokémon in regular grass instead of shaking grass
- Leave the route
- Use your bike
- Run from battle
Final Thoughts
The PokéRadar in Pokémon Brilliant Diamond and Shining Pearl is easier to understand than the original version, but it is not necessarily easier to master.
The method constantly asks you to balance risk, patience, and reward. Pushing to 40 gives you the best shiny odds, but the odds of reaching that point are much lower than many players expect. Stopping earlier, especially around chain 17, can feel more practical, even though each individual shiny roll is weaker.
If you want the safest approach, catch every target Pokémon and prioritize four-tile patches. Once you reach your chosen stopping point, stop advancing the chain and start resetting for shiny grass.
The PokéRadar will still break your heart sometimes, but when that shiny patch finally sparkles, the whole process feels worth it.