Understanding the Pokéradar and Shiny Odds
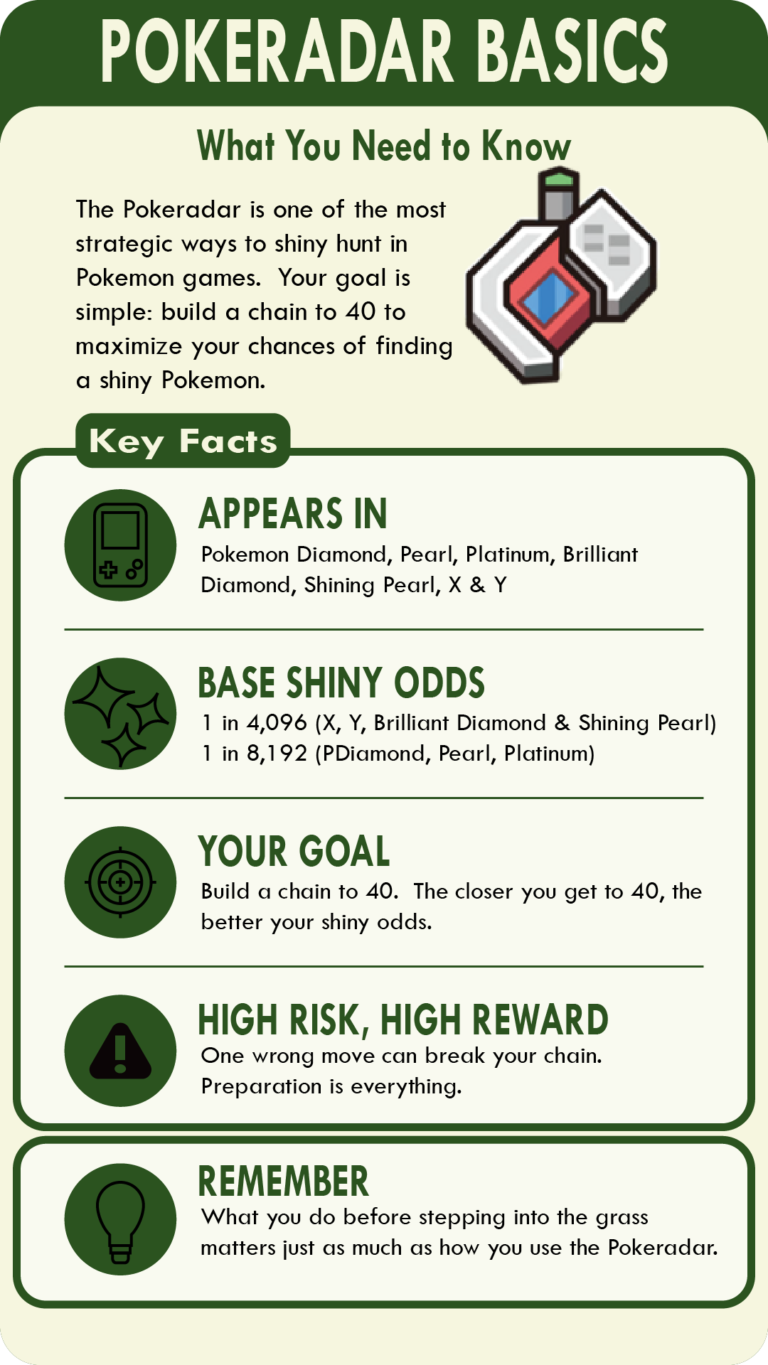
Finding a shiny Pokémon carries a real sense of rarity, with base odds sitting at 1 in 4096, or 1 in 8192 in earlier generations. Those odds are exactly what make the moment feel special, but they can also make shiny hunting seem out of reach for more casual players. Over time, Pokémon games have introduced a variety of methods to make hunting more accessible, from SOS chaining to catch combos and even the sandwich system in more recent titles. Each approach improves your odds in its own way, but few strike a balance between strategy and reward quite like the Pokéradar.
Across the generations, the Pokéradar has seen subtle differences depending on the game. It appears in Pokémon Diamond, Pearl, Platinum, Brilliant Diamond, Shining Pearl, and X & Y, and while the core concept remains consistent, the finer details can change how you approach each hunt. This guide serves as a general Pokéradar overview, covering the fundamentals while linking to game-specific guides that break down the nuances, so you can use the Pokéradar effectively in each version.
The Pokéradar creates a unique balance between strategy and luck, but it is also one of the most unforgiving shiny hunting methods in the series, where a single mistake can break your chain. That tension is exactly why preparation matters. If you want consistent results, what you do before you even step into the grass is just as important as how you use the radar itself.
Let’s start simple before diving deeper. To maximize your odds of finding a shiny Pokémon using the Pokéradar, regardless of which game you are playing, your goal is to build a chain to 40, not necessarily to find a shiny Pokémon. The closer your chain gets to that number, the more likely you are to encounter a shiny patch. Reaching a 40 chain consistently comes down to preparation, and more specifically, having enough resources to maintain your chain without interruption.
Preparation: Items, Money, and Team Setup
It is tempting to jump straight into the grass and start chaining to the Pokéradar music, but before you begin, there are a few things you should take care of first. Whether you are using the Pokéradar in Generation 4, its remakes, or Generation 6, the first step to success is building up your in-game money and stocking up on the right items.
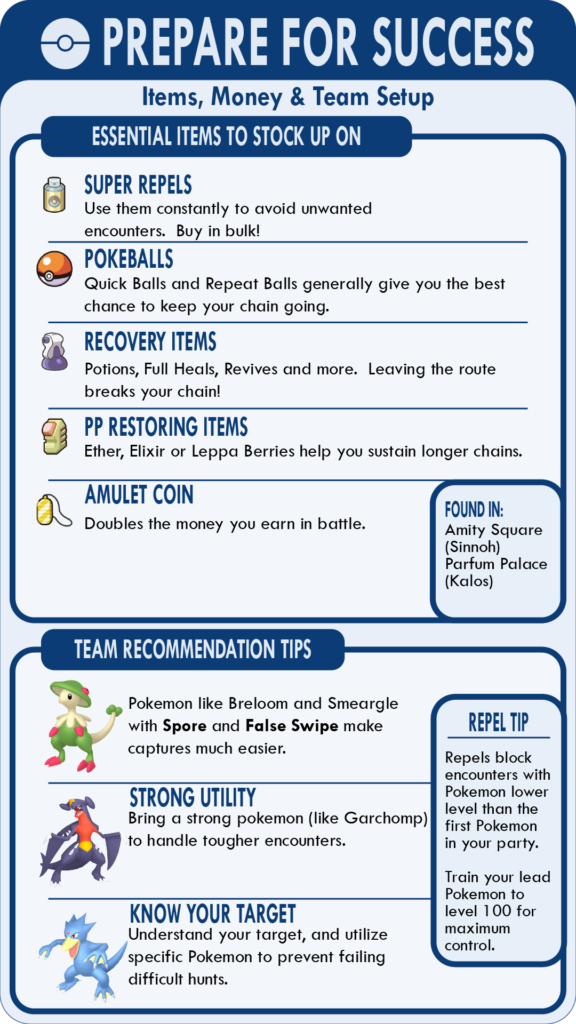
Shiny hunting with the Pokéradar is not cheap, and it does not pay for itself. You will be using Repels constantly, so buying them in bulk is essential. Super Repels are the best option, since they give you more steps for your money and reduce how often you need to restock.
You can carry up to 999 Super Repels, and realistically, you will go through more than you expect. I recommend starting with at least 500 before your first serious hunt, because nothing burns through Repels faster than pushing a chain to 40 and beyond.
You will also want to stock up on Poké Balls, especially Quick Balls and Repeat Balls. I will go into more detail later, but the short version is that catching a Pokémon gives you a better chance of continuing your chain than knocking it out.
Other items worth stockpiling include recovery items, such as Potions, Full Heals, and Revives, as well as PP-restoring items like Ether, Elixir, or Leppa Berries. These become especially important during longer chains, where leaving the route to heal is a guaranteed way to break your chain.
To support all of these purchases, I highly recommend obtaining the Amulet Coin. When held by a Pokémon that participates in battle, it doubles the money you earn, making your grinding far more efficient. The Amulet Coin can be found in Amity Square in the Sinnoh games and in Parfum Palace in Pokémon X & Y.
While you can farm the Elite Four for money, there are faster and more efficient options. In the Sinnoh games, using the Vs. Seeker to repeatedly battle Socialite Reina and Gentleman Jeremy on Route 212 is one of the quickest ways to build up cash. In Pokémon X & Y, the Elite Four remains a reliable option since it has no entry cost. Restaurant Le Wow can generate large payouts in the postgame, but the 100,000 PokéDollar entry fee makes it a risky investment, so it is usually better to stick with the Elite Four until you are more comfortable spending.
Once you have your items, keeping them organized in your bag is a small but helpful step. Place your Repels near the top so they are easy to access, organize your Poké Balls so you can quickly select them during encounters, and register your Pokéradar so you can quickly access it. While none of that is strictly required, following those steps can help prevent small mistakes in the middle of a chain.
While it is not essential, there is an application that is especially useful in the Sinnoh games. In Pokémon Diamond, Pearl, Platinum, Brilliant Diamond, and Shining Pearl, you can obtain a Pokétch app that helps you visualize whether your chain is still active and which Pokémon you are chaining. You can obtain this by visiting Ramanas Park in Brilliant Diamond and Shining Pearl or Pal Park in Diamond, Pearl, and Platinum, both located in the southeastern area of Route 221. The app is obtained by Professor Oak.
Beyond items and money, your team matters just as much. Pokémon like Breloom and Smeargle are excellent support options thanks to moves like Spore and False Swipe, which make capturing Pokémon much easier. Having a strong utility Pokémon, such as Garchomp, can also help handle tougher encounters when needed. Ideally, your team should include both reliable ways to knock out your target and tools to safely capture it.
As you construct your team, keep Repel mechanics in mind. Repels prevent wild encounters with Pokémon that are lower level than the first Pokémon in your party. For that reason, it is important to train your lead Pokémon to a high level, ideally level 100, to maximize control over encounters.
You should also understand your target Pokémon before you begin. If you are hunting something like Voltorb, you do not want your shiny to use Self-Destruct or Explosion. Bringing a Pokémon with the Damp ability, such as Golduck, prevents those moves entirely and can save your hunt.
With a strong supply of Super Repels, plenty of Poké Balls, and a well-prepared team of high-level Pokémon, you will be in a position where the only thing standing between you and a shiny is execution, and a bit of luck.
More Articles


Please note that some external links on this page are affiliate links, which means if you click them and make a purchase we may receive a small percentage of the sale.
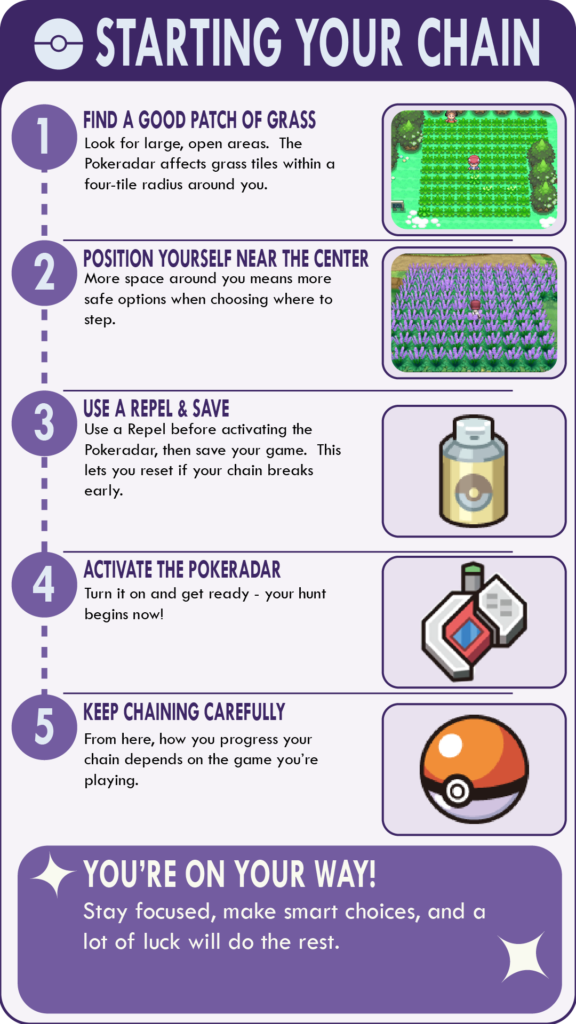
Starting Your Pokéradar Chain
Now that your preparation is complete, it is time to start using the Pokéradar. While the radar behaves slightly differently across generations, the process of beginning a chain is the same regardless of which game you are playing.
The first thing you will want to do is find a suitable patch of grass. The Pokéradar works by causing grass tiles to shake within a four-tile radius around your character. While you can use the Pokéradar in any grassy area, larger patches are always better, since they give you more safe options when choosing where to step.
Once you have found a large, open patch of grass, position yourself near the center. Before activating the Pokéradar, use a Repel and save your game. The Pokéradar can be unforgiving, and saving beforehand allows you to reset if your chain breaks early, preserving both your time and your resources.
After saving your progress, you can activate the Pokéradar.
Congratulations, you’ve taken your first steps toward mastering the Pokéradar. From this point forward, how you progress your chain will vary depending on which game you are playing. For additional tips, refer to the game-specific guides for Pokémon Diamond, Pearl, and Platinum, Pokémon X & Y, and Pokémon Brilliant Diamond and Shining Pearl.